Istio 作为目前 Service Mesh 方案中的翘楚,吸引着越来越多的企业及开发者。越来越多的团队想将其应用于微服务的治理,但在实际落地时却因为不了解 Istio 黑盒中的运行机制而左右为难,本文将基于 1.7 的源码讲解 Istio 的核心组件 Pilot 的结构及运行流程,希望对读者应用 Istio 有所助益。
注:本文基于 istio release-1.7 分支分析,其他版本的代码结构会有所不同。
背景
随着 Istio 1.7 的发布,内部组件精简后的 istiod 日趋稳定,越来越多的公司将其应用到自身微服务的流量治理、安全通信及监测中。多点也不例外,应用 Istio 来落地业务系统所有 Dubbo 服务的网格化,下沉 SDK 逻辑,解决基础中间件与业务系统过于耦合等痛点。 目前,我们是通过自己开发的 Controller 组件对接 Zookeeper 等注册中心,将注册到 Zookeeper 的节点实时转化为 ServiceEntry 及 WorkloadEntry 等 Istio 配置类型写入 kube-apiserver,再由 Pilot 转化为 xDS 协议下发至数据面,同时对集群、虚拟机中的服务进行治理。随着公司服务网格化的逐步落地,对 Istio 及数据面组件源码级掌握的诉求越来越高,没有足够的深度及广度很难解决开发过程中遇到的难题,让我们一起揭开 Istio 神秘的面纱,看看黑箱内部是如何运作的。
本文作为 Istio 控制面组件 Pilot 的源码分析系列,主要面向刚接触 Istio 或仅停留在使用 Istio 基本配置类型(如 VirtualService、DestinationRule 等)的同学,需要熟悉 Istio 的一些 基础概念及名词 。文章会涉及较多的代码细节,我们会以不同的篇幅分别介绍以下内容:
pilot-discovery宏观架构及启动流程梳理pilot-discovery接口设计及关键接口分析pilot-discovery xDS生成及下发流程梳理pilot-agent流程梳理pilot中的身份认证及安全通信解析
相信通过源码一步一步分析,能消除读者对 Pilot 的陌生感,在基于 Pilot 做适配开发时会更加清楚的了解其底层运行逻辑,碰到问题时也能更好的定位。
Pilot 的代码主要分为两部分:
pilot-discoverypilot-agent
其中 pilot-agent 负责数据面 Sidecar 实例的生命周期管理,而 pilot-discovery 负责控制面流量管理配置及路由规则的生成和下发。
宏观架构
pilot-discovery 的核心组件如图:

其中 Server 为 pilot-discovery 的主服务,包含了三个比较重要的组件:
Config Controller:从不同来源接收流量控制和路由规则等Istio的配置,并响应各类事件。Service Controller:从不同注册中心同步服务及实例,并响应各类事件。EnvoyXdsServer:核心的xDS协议推送服务,根据上面组件的数据生成xDS协议并下发。
Config Controller 比较核心的就是对接 Kubernetes,从 kube-apiserver 中 Watch 集群中的 VirtualService、ServiceEntry、DestinationRules 等配置信息,有变化则生成 PushRequest 推送至 EnvoyXdsServer 中的推送队列。除此之外,还支持对接 MCP(Mesh Configuration Protocol) 协议的 gRPC Server,如 Nacos 的 MCP 服务等,只需要在 meshconfig 中配置 configSources 即可。最后一种是基于内存的 Config Controller 实现,通过 Watch 一个文件目录,加载目录中的 yaml 文件生成配置数据,主要用来测试。
Service Controller 目前原生支持 Kubernetes 和 Consul,注册在这些注册中心中的服务可以无痛接入 Mesh,另外一种比较特殊,就是 ServiceEntryStore,它本质是储存在 Config Controller 中的 Istio 配置数据,但它描述的却是集群外部的服务信息,详情可阅读文档 ServiceEntry,Istio 通过它将集群外部,如部署在虚拟机中的服务、非 Kubernetes 的原生服务同步到 Istio 中,纳入网格统一进行流量控制和路由,所以 ServiceEntryStore 也可以视为一种注册中心。还有一种就是 Mock Service Registry,主要用来测试。
ServiceEntryStore 从 Config Controller 到 Service Controller 的转化流程大致如图(后续会做详细的代码分析,这里简单了解一下即可):

ConfigStores 是一个列表,里面存储了各类 Istio 配置文件,包括 ServiceEntry 、WorkloadEntry 等服务数据,也包括 VirtualService、DestinationRules、Sidecar 等流量控制、路由规则的配置数据,pilot-discovery 将这些 ConfigStores 聚合成一个 configController 统一进行管理,之后再从其中衍生出 IstioConfigStore,将其作为 serviceEntryStore 的配置源。serviceEntryStore 其实就是 ServiceEntry Controller,响应 ServiceEntry 和 WorkloadEntry 这类服务信息的变化。
EnvoyXdsServer 比较核心,一切与 xDS 协议相关的接收、转换、下发操作都由它完成。EnvoyXdsServer 对接所有集群中的边车代理,如 Envoy、MOSN 等,当配置或服务发生变化时主动推送,也会响应代理发送的请求,依据请求的信息下发相应的 xDS 配置。
理解了这三个核心组件的定义,就能比较好的理解下面分析的各类流程了。
pilot-discovery 的整个业务流程梳理如下,可以先大概浏览一遍,之后我们逐一进行分析:

启动流程梳理
首先详细看一下 pilot-discovery 的启动流程。pilot-discovery 组件的入口代码在 istio/pilot/cmd/pilot-discovery 中。该目录中包含两个文件: main.go 和 request.go。main.go 中定义了 pilot-discovery 根命令及 discovery 命令,是启动服务发现及配置下发的主流程; 另一个文件 request.go 中定义了 request 命令,用来请求 Pilot 中的 metrics/debug 接口,多用来调试。
main.go 中 discoveryCmd的 RunE 函数定义了启动过程,代码如下:
// 创建一个接收空结构的 stop channel 用来停止所有 servers
stop := make(chan struct{})

// 创建服务发现的 Server
discoveryServer, err := bootstrap.NewServer(serverArgs)
if err != nil {
  return fmt.Errorf("failed to create discovery service: %v", err)
}

// 运行 Server 中注册的所有服务
if err := discoveryServer.Start(stop); err != nil {
  return fmt.Errorf("failed to start discovery service: %v", err)
}

// 等待 SIGINT 和 SIGTERM 信号并关闭 stop channel
cmd.WaitSignal(stop)
启动流程如图所示:

初始化流程
接下来介绍 discoveryServer ,即 pilot-discovery 组件的核心。在这之前先看下 Server 的结构,代码位于 istio/pilot/pkg/bootstrap/server.go 文件中。
Server 的关键字段如下:
type Server struct {
  XDSServer *xds.DiscoveryServer  // Xds 服务
  environment *model.Environment  // Pilot 环境所需的 API 集合
  kubeRegistry *kubecontroller.Controller   // 处理 Kubernetes 主集群的注册中心
  multicluster *kubecontroller.Multicluster // 处理 Kubernetes 多个集群的注册中心
  configController  model.ConfigStoreCache  // 统一处理配置数据(如 VirtualService 等) 的 Controller
  ConfigStores      []model.ConfigStoreCache // 不同配置信息的缓存器,提供 Get、List、Create 等方法
  serviceEntryStore *serviceentry.ServiceEntryStore // 单独处理 ServiceEntry 的 Controller
  fileWatcher filewatcher.FileWatcher // 文件监听器,主要 watch meshconfig 和 networks 配置文件等
  startFuncs []startFunc // 保存了上述所有服务的启动函数,便于在 Start() 方法中批量启动及管理
}
再看 NewServer() 方法中的内容,有以下几个关键步骤:
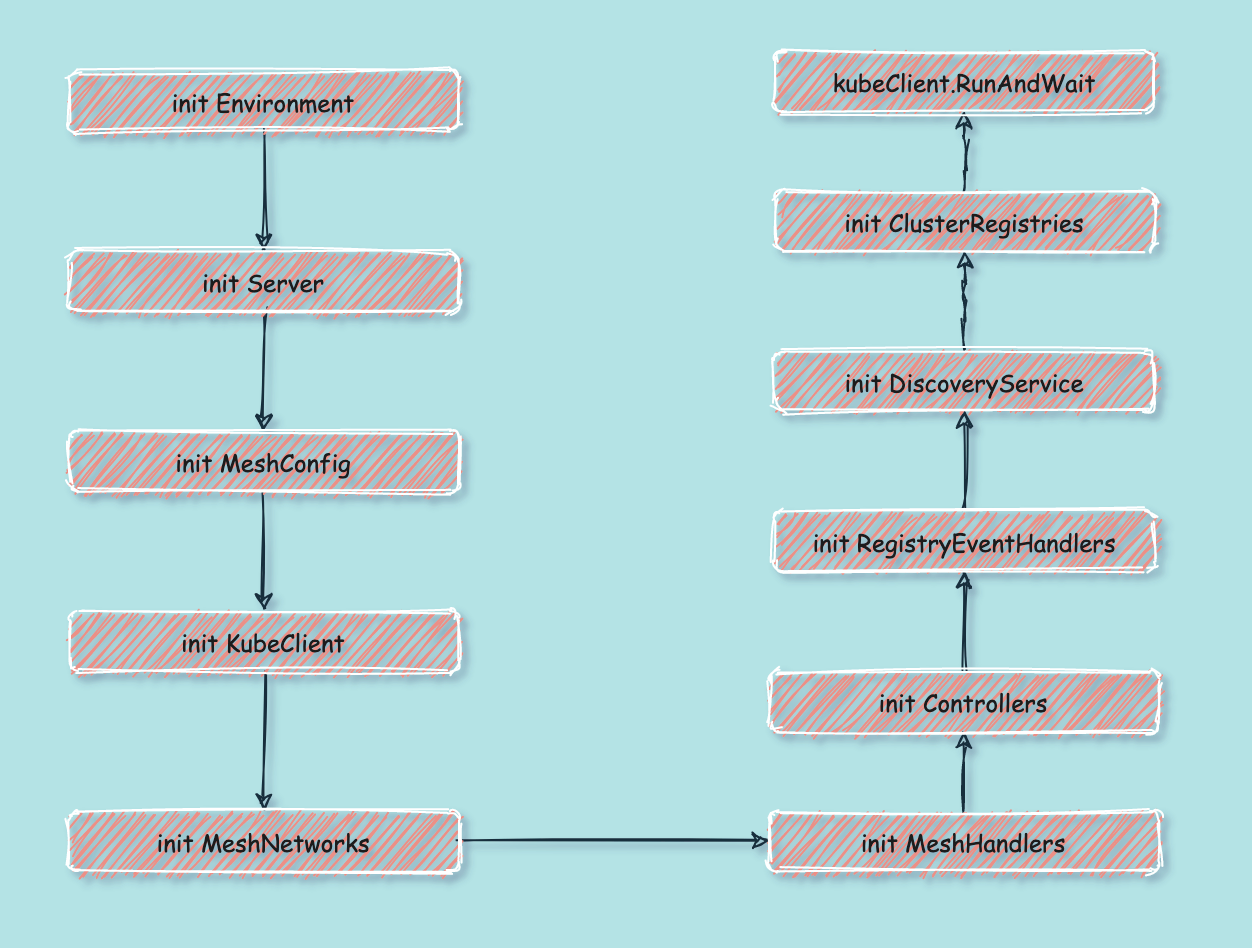
我们对每个步骤逐一进行分析:
-
初始化
Environment什么是
Environment呢?根据定义Environment为Pilot提供了一个汇总的、运行中所需的 API 集合。Environment中字段(接口)如下:type Environment struct { ServiceDiscovery // 服务发现的接口模型,主要列出 services 和 instances IstioConfigStore // Istio 配置文件的存储器,主要列出 ServiceEntry 等配置 mesh.Watcher // mesh config 文件的监听器 mesh.NetworksWatcher // mesh network config 文件的监听器 PushContext *PushContext // 在推送(下发 xDS)生成期间保存信息的上下文 DomainSuffix string // istio server 默认的后缀域名 }其中
PushContext是Pilot在推送xDS前,生成配置期间保存相关信息的上下文的地方,在全量推送配置和配置发生改变时重置。它会保存所有的错误和统计信息,并缓存一些配置的计算信息。ServiceDiscovery提供了枚举Istio中服务和实例的方法。mesh.Watcher和mesh.NetworksWatcher负责监听istiod启动时挂载的两个配置文件,这两个配置文件是通过configmap映射到Pod的文件系统中的,监听器将在监听到配置文件变化时运行预先注册的Handler。文件挂载参考istiod的配置文件:apiVersion: v1 kind: Pod metadata: name: istiod-56c488887d-z9k5c namespace: istio-system spec: containers: volumeMounts: - mountPath: /etc/istio/config name: config-volume volumes: - configMap: defaultMode: 420 name: istio name: config-volume相应的配置存储在
istio-system/istio这个configmap中,里面保存了mesh和meshNetworks两种配置,样例如下:apiVersion: v1 kind: ConfigMap metadata: name: istio namespace: istio-system data: mesh: |- accessLogEncoding: TEXT accessLogFile: "" accessLogFormat: "" defaultConfig: binaryPath: /usr/local/bin/mosn concurrency: 2 configPath: ./etc/istio/proxy ... meshNetworks: 'networks: {}'再回头看
Environment的初始化:e := &model.Environment{ PushContext: model.NewPushContext(), DomainSuffix: args.RegistryOptions.KubeOptions.DomainSuffix, } ac := aggregate.NewController(aggregate.Options{ MeshHolder: e, }) e.ServiceDiscovery = ac首先是初始化了一份
PushContext,创建PushContext所需的各种列表和Map。 其次是初始化了一个聚合所有注册中心的Controller作为Environment中的ServiceDiscovery。 该Controller提供从所有注册中心(如Kubernetes, Consul, MCP等)获取服务和实例列表的方法。 这里传入了一个参数MeshHolder是想利用Environment中的mesh.Watcher将mesh这个配置同步过去。 -
初始化
ServerServer的结构之前分析过,这里将之前初始化的Environment传入后,开始初始化XDSServer。s := &Server{ clusterID: getClusterID(args), environment: e, XDSServer: xds.NewDiscoveryServer(e, args.Plugins), // 初始化 XDSServer fileWatcher: filewatcher.NewWatcher(), httpMux: http.NewServeMux(), monitoringMux: http.NewServeMux(), readinessProbes: make(map[string]readinessProbe), }XDSServer相关的代码在istio/pilot/pkg/xds/discovery.go中,对应为DiscoveryServer,该服务为Envoy xDS APIs的gRPC实现。DiscoveryServer关键定义如下:type DiscoveryServer struct { Env *model.Environment // 即上述 pilot server 中的 Environment ConfigGenerator core.ConfigGenerator // 控制面 Istio 配置的生成器,如 VirtualService 等 Generators map[string]model.XdsResourceGenerator // 针对不同配置类型的定制化生成器 concurrentPushLimit chan struct{} // 不同服务所有实例的集合,增量更新,key 为 service 和 namespace // EndpointShards 中是以不同的注册中心名为 key 分组保存实例 EndpointShardsByService map[string]map[string]*EndpointShards pushChannel chan *model.PushRequest // 接收 push 请求的 channel pushQueue *PushQueue // 防抖之后,真正 Push xDS 之前所用的缓冲队列 adsClients map[string]*Connection // ADS 和 EDS 的 gRPC 连接 StatusReporter DistributionStatusCache // 监听 xDS ACK 和连接断开 // xDS 状态更新的生成器(更新 connect, disconnect, nacks, acks) // 状态更新后向所有 connection 推送 DiscoveryResponse InternalGen *InternalGen serverReady bool // 表示缓存已同步,server 可以接受请求 debounceOptions debounceOptions // 防抖设置 cache Cache // xDS 资源的缓存,目前仅适用于 EDS,线程安全 } -
初始化
MeshConfig、KubeClient、MeshNetworks和MeshHandlerss.initMeshConfiguration(args, s.fileWatcher) if err := s.initKubeClient(args); err != nil { return nil, fmt.Errorf("error initializing kube client: %v", err) } s.initMeshNetworks(args, s.fileWatcher) s.initMeshHandlers()这几个初始化函数比较好理解,
initMeshConfiguration和initMeshNetworks都是通过fileWatcher对istiod从configmap中挂载的两个配置文件mesh和meshNetworks进行监听。当配置文件发生变化时重载配置并触发相应的Handlers。filewatcher的代码在另一个管理通用工具包的项目里:github.com/istio/pkg/filewatcher,感兴趣的同学可以再详细研究下,底层使用到了 fsnotify 这个库来推送文件变化事件。initMeshHandlers为上述两个配置文件注册了两个Handler,当配置文件发生变化时触发全量xDS下发。 -
初始化
Controllers这部分比较核心,初始化了三种控制器分别处理证书、配置信息和注册信息,证书及安全相关的内容本篇先暂不讨论。主要来看
initConfigController和initServiceControllers。func (s *Server) initControllers(args *PilotArgs) error { log.Info("initializing controllers") if err := s.initCertController(args); err != nil { return fmt.Errorf("error initializing certificate controller: %v", err) } if err := s.initConfigController(args); err != nil { return fmt.Errorf("error initializing config controller: %v", err) } if err := s.initServiceControllers(args); err != nil { return fmt.Errorf("error initializing service controllers: %v", err) } return nil }配置信息大都是
Istio定义的一系列CRD(如VirtualService、DestinationRules等),一个控制面可以通过MCP同时接入多个Kubernetes之外的配置数据源,也可通过文件目录(主要用来调试)挂载,默认是读取 Kubernetes 中的配置数据:func (s *Server) initK8SConfigStore(args *PilotArgs) error { configController, err := s.makeKubeConfigController(args) ... s.initStatusController(args, features.EnableStatus) // 初始化上面提到的 StatusReporter return nil }配置数据包括以下类型,具体每个类型的含义
Istio官网都有介绍及用例,这里不再赘述:// PilotServiceApi contains only collections used by Pilot, including experimental Service Api. PilotServiceApi = collection.NewSchemasBuilder(). MustAdd(IstioNetworkingV1Alpha3Destinationrules). MustAdd(IstioNetworkingV1Alpha3Envoyfilters). MustAdd(IstioNetworkingV1Alpha3Gateways). MustAdd(IstioNetworkingV1Alpha3Serviceentries). MustAdd(IstioNetworkingV1Alpha3Sidecars). MustAdd(IstioNetworkingV1Alpha3Virtualservices). MustAdd(IstioNetworkingV1Alpha3Workloadentries). MustAdd(IstioNetworkingV1Alpha3Workloadgroups). MustAdd(IstioSecurityV1Beta1Authorizationpolicies). MustAdd(IstioSecurityV1Beta1Peerauthentications). MustAdd(IstioSecurityV1Beta1Requestauthentications). MustAdd(K8SServiceApisV1Alpha1Gatewayclasses). MustAdd(K8SServiceApisV1Alpha1Gateways). MustAdd(K8SServiceApisV1Alpha1Httproutes). MustAdd(K8SServiceApisV1Alpha1Tcproutes). Build()详细看下
initK8SConfigStore中的makeKubeConfigController方法,这里初始化了一个处理Istio CRDs的Client,实现ConfigStoreCache这个接口中增删改查等方法。func (s *Server) makeKubeConfigController(args *PilotArgs) (model.ConfigStoreCache, error) { c, err := crdclient.New(s.kubeClient, buildLedger(args.RegistryOptions), args.Revision, args.RegistryOptions.KubeOptions) if err != nil { return nil, err } return c, nil }Client定义如下:type Client struct { schemas collection.Schemas // Istio CRDs shemas domainSuffix string configLedger ledger.Ledger revision string kinds map[resource.GroupVersionKind]*cacheHandler // 跟踪已知类型的所有缓存 handler queue queue.Instance istioClient istioclient.Interface serviceApisClient serviceapisclient.Interface }再依次对这些类型创建
Informer开启监听。回到initConfigController,创建好ConfigStore之后,再对其进一步包装:// 将所有 ConfigStore 聚合并缓存 aggregateConfigController, err := configaggregate.MakeCache(s.ConfigStores) // 通过 s.configController 统一操作上面聚合的 ConfigStores s.configController = aggregateConfigController // 将其包装为 IstioConfigStore 传入 environment,便于操作 ServiceEntry/Gateway 等资源 // IstioConfigStore 会在之后的 ServiceEntryStore 中用到 s.environment.IstioConfigStore = model.MakeIstioStore(s.configController)最后将该
Controller的启动函数注册到startFuncs中:s.addStartFunc(func(stop <-chan struct{}) error { go s.configController.Run(stop) return nil })再来看
initServiceControllers处理服务发现的Controller初始化:func (s *Server) initServiceControllers(args *PilotArgs) error { serviceControllers := s.ServiceController() for _, r := range args.RegistryOptions.Registries { // ... switch serviceRegistry { case serviceregistry.Kubernetes: if err := s.initKubeRegistry(serviceControllers, args); err != nil { return err } // ... } // ... }从之前初始化的
environment.ServiceDiscovery中获取已注册的服务中心,如果是Kubernetes则执行initKubeRegistry:// initKubeRegistry creates all the k8s service controllers under this pilot func (s *Server) initKubeRegistry(serviceControllers *aggregate.Controller, args *PilotArgs) (err error) { // ... log.Infof("Initializing Kubernetes service registry %q", args.RegistryOptions.KubeOptions.ClusterID) kubeRegistry := kubecontroller.NewController(s.kubeClient, args.RegistryOptions.KubeOptions) s.kubeRegistry = kubeRegistry serviceControllers.AddRegistry(kubeRegistry) return }进一步初始化
Kubernetes注册中心,方法为NewController,先看一下这个Controller的结构:type Controller struct { client kubernetes.Interface queue queue.Instance serviceInformer cache.SharedIndexInformer serviceLister listerv1.ServiceLister endpoints kubeEndpointsController nodeInformer cache.SharedIndexInformer nodeLister listerv1.NodeLister pods *PodCache metrics model.Metrics networksWatcher mesh.NetworksWatcher xdsUpdater model.XDSUpdater domainSuffix string clusterID string serviceHandlers []func(*model.Service, model.Event) instanceHandlers []func(*model.ServiceInstance, model.Event) workloadHandlers []func(*model.WorkloadInstance, model.Event) sync.RWMutex servicesMap map[host.Name]*model.Service nodeSelectorsForServices map[host.Name]labels.Instance nodeInfoMap map[string]kubernetesNode externalNameSvcInstanceMap map[host.Name][]*model.ServiceInstance workloadInstancesByIP map[string]*model.WorkloadInstance ranger cidranger.Ranger networkForRegistry string once sync.Once }可以看到
Controller对Services、Nodes、Pods等资源各自初始化了Informer、 Lister 以及对应的 Map,各类 Handlers 在 Informer 监听到增删改查时推送相应的事件到 queue ,再由onServiceEvent、onNodeEvent、c.pods.onEvent中更新对应的 Map 。回到
initServiceControllers,初始化完 Kubernetes 注册中心之后,还需要关注 Kubernetes 集群之外的服务,这些服务基本都是通过ServiceEntry注册到控制面的,所有ServiceEntry配置数据目前还都在之前初始化的configController配置中心控制器中,这里将ServiceEntry数据单独拎出来初始化一个ServicEntry注册中心,加入到serviceControllers中:s.serviceEntryStore = serviceentry.NewServiceDiscovery( s.configController, s.environment.IstioConfigStore, s.XDSServer) serviceControllers.AddRegistry(s.serviceEntryStore)serviceEntryStore相关的逻辑会在后续 xDS 下发流程的分析中再阐述。最后将
serviceControllers中所有的服务注册中心的Controller的启动函数都注册到startFuncs中:s.addStartFunc(func(stop <-chan struct{}) error { go serviceControllers.Run(stop) return nil })// Run starts all the controllers func (c *Controller) Run(stop <-chan struct{}) { for _, r := range c.GetRegistries() { go r.Run(stop) } <-stop log.Info("Registry Aggregator terminated") } -
初始化
RegistryEventHandlersinitRegistryEventHandlers设置了三个事件处理器serviceHandler、instanceHandler和configHandler分别响应服务、实例和配置数据的更新事件。serviceHandler如下:serviceHandler := func(svc *model.Service, _ model.Event) { pushReq := &model.PushRequest{ Full: true, ConfigsUpdated: map[model.ConfigKey]struct{}{{ Kind: gvk.ServiceEntry, Name: string(svc.Hostname), Namespace: svc.Attributes.Namespace, }: {}}, Reason: []model.TriggerReason{model.ServiceUpdate}, } s.XDSServer.ConfigUpdate(pushReq) } if err := s.ServiceController().AppendServiceHandler(serviceHandler); err != nil { return fmt.Errorf("append service handler failed: %v", err) }可以看到当服务本身发生变化时,会触发
xDS的全量下发,所有与该服务相关的代理都会收到推送。实例的变动也会触发
xDS的全量下发,不过仅在连接Consul时生效。Kubernetes和MCP这两种服务发现的场景下,更新事件的Handler是在别的地方注册的。instanceHandler := func(si *model.ServiceInstance, _ model.Event) { // TODO: This is an incomplete code. This code path is called for consul, etc. // In all cases, this is simply an instance update and not a config update. So, we need to update // EDS in all proxies, and do a full config push for the instance that just changed (add/update only). s.EnvoyXdsServer.ConfigUpdate(&model.PushRequest{ Full: true, ConfigsUpdated: map[model.ConfigKey]struct{}{{ Kind: gvk.ServiceEntry, Name: string(si.Service.Hostname), Namespace: si.Service.Attributes.Namespace, }: {}}, Reason: []model.TriggerReason{model.ServiceUpdate}, }) } // 跳过 Kubernetes 和 MCP for _, registry := range s.ServiceController().GetRegistries() { // Skip kubernetes and external registries as they are handled separately if registry.Provider() == serviceregistry.Kubernetes || registry.Provider() == serviceregistry.External { continue } if err := registry.AppendInstanceHandler(instanceHandler); err != nil { return fmt.Errorf("append instance handler to registry %s failed: %v", registry.Provider(), err) } }上一步初始化了
configController,它操作的对象主要是像VirtualService、DestinationRules这些Istio定义的配置,这些配置的变化也会触发xDS的全量下发,所有与该配置相关的代理都会收到推送。不过ServiceEntry和WorkloadEntry除外,这两个资源的配置下发是由ServiceEntryStore管理的,之前在初始化ServiceController时定义的s.serviceEntryStore会处理,之后的篇幅再做详细介绍。configHandler := func(_, curr model.Config, event model.Event) { pushReq := &model.PushRequest{ Full: true, ConfigsUpdated: map[model.ConfigKey]struct{}{{ Kind: curr.GroupVersionKind, Name: curr.Name, Namespace: curr.Namespace, }: {}}, Reason: []model.TriggerReason{model.ConfigUpdate}, } s.EnvoyXdsServer.ConfigUpdate(pushReq) }下面是跳过
ServiceEntry和WorkloadEntry的代码:for _, schema := range schemas { // This resource type was handled in external/servicediscovery.go, no need to rehandle here. if schema.Resource().GroupVersionKind() == collections.IstioNetworkingV1Alpha3Serviceentries. Resource().GroupVersionKind() { continue } if schema.Resource().GroupVersionKind() == collections.IstioNetworkingV1Alpha3Workloadentries. Resource().GroupVersionKind() { continue } s.configController.RegisterEventHandler(schema.Resource().GroupVersionKind(), configHandler) } -
初始化
DiscoveryServicefunc (s *Server) initDiscoveryService(args *PilotArgs) error { log.Infof("starting discovery service") // Implement EnvoyXdsServer grace shutdown s.addStartFunc(func(stop <-chan struct{}) error { s.EnvoyXdsServer.Start(stop) return nil }) s.initGrpcServer(args.KeepaliveOptions) grpcListener, err := net.Listen("tcp", args.ServerOptions.GRPCAddr) if err != nil { return err } s.GRPCListener = grpcListener return nil }这里将
EnvoyXdsServer的启动添加至startFuncs中,便于后续统一启动。并初始化gRPC服务器,监听对应的端口。初始化
gRPC服务器,并注册xDS V2和xDS V3的ADS服务到gRPC服务器上:func (s *Server) initGrpcServer(options *istiokeepalive.Options) { grpcOptions := s.grpcServerOptions(options) s.grpcServer = grpc.NewServer(grpcOptions...) s.EnvoyXdsServer.Register(s.grpcServer) reflection.Register(s.grpcServer) }func (s *DiscoveryServer) Register(rpcs *grpc.Server) { // Register v2 and v3 servers discovery.RegisterAggregatedDiscoveryServiceServer(rpcs, s) discoveryv2.RegisterAggregatedDiscoveryServiceServer(rpcs, s.createV2Adapter()) }可以看到
ADS的gRPC服务包含两个流式方法,一个是全量推送,一个是增量推送。var _AggregatedDiscoveryService_serviceDesc = grpc.ServiceDesc{ ServiceName: "envoy.service.discovery.v3.AggregatedDiscoveryService", HandlerType: (*AggregatedDiscoveryServiceServer)(nil), Methods: []grpc.MethodDesc{}, Streams: []grpc.StreamDesc{ { StreamName: "StreamAggregatedResources", Handler: _AggregatedDiscoveryService_StreamAggregatedResources_Handler, ServerStreams: true, ClientStreams: true, }, { StreamName: "DeltaAggregatedResources", Handler: _AggregatedDiscoveryService_DeltaAggregatedResources_Handler, ServerStreams: true, ClientStreams: true, }, }, Metadata: "envoy/service/discovery/v3/ads.proto", } -
注册
kubeClient.RunAndWait将
kubeClient.RunAndWait方法注册至startFuncs中,RunAndWait启动后所有Informer将开始缓存,并等待它们同步完成。之所以在最后运行,可以保证所有的Informer都已经注册。if s.kubeClient != nil { s.addStartFunc(func(stop <-chan struct{}) error { s.kubeClient.RunAndWait(stop) return nil }) }
启动过程
启动流程比较简单,核心是依次启动初始化过程中注册到 startFuncs 中的启动函数:
for _, fn := range s.startFuncs {
  if err := fn(stop); err != nil {
    return err
  }
}
然后调用 waitForCache 等待需要监听资源的 Informer 缓存完毕,完成后开启 HTTP 服务响应 readiness 事件。
至此 pilot-discovery 的启动流程就结束了,有了大概了解后,可以大致归纳出整个 Pilot 的接口架构。
接口设计
在接口设计方面,Pilot 主要有两类接口:一种是 Store 类接口,定义对资源的增删改查等方法;另一种是 Controller 类接口,定义了 RegisterEventHandler 和 Run 方法。
Store 类接口主要指 ConfigStore 接口,以及它衍生出的 IstioConfigStore,后者操作的对象为 Istio 定义的配置类型,如 VirtualService、ServiceEntry 等。
而 Controller 类接口指基于 ConfigStore 定义的 ConfigStoreCache 接口,这个接口在哪里用到了呢?之前讨论初始化流程的时候,分析过 Pilot 的 Server 的结构,其中用到该接口的有如下几个字段:
type Server struct {
  configController  model.ConfigStoreCache
	ConfigStores      []model.ConfigStoreCache
	serviceEntryStore *serviceentry.ServiceEntryStore
}

type ServiceEntryStore struct {
  store model.IstioConfigStore
}
可以看到 ConfigStores 是存储所有配置类数据的 Controller 的地方,ConfigStores 都是在哪里添加的呢?之前分析 initConfigController 方法中提到过,可以再对照代码看一下调用的地方:
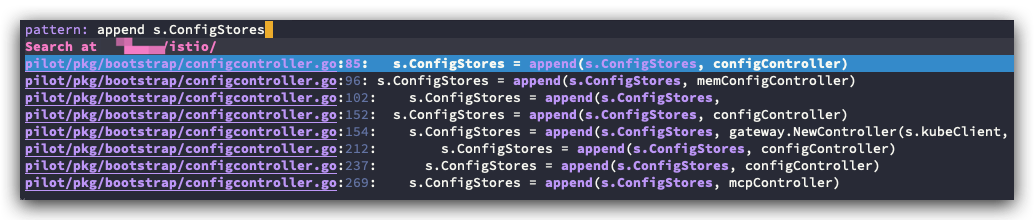
都添加完毕后,会把这些 ConfigStoreCache 都聚合到 Server.configController 中统一处理。
	// Wrap the config controller with a cache.
	aggregateConfigController, err := configaggregate.MakeCache(s.ConfigStores)
	if err != nil {
		return err
	}
	s.configController = aggregateConfigController
而 ServiceEntryStore 中用到的 IstioConfigStore 也是在这里得到的:
s.environment.IstioConfigStore = model.MakeIstioStore(s.configController)
以上,当服务启动后,会逐个调用这些 ConfigStoreCache 中的 Run 方法处理资源的增删改事件。
总结
pilot-discovery 的启动流程初看是比较复杂,但理清楚中间核心的步骤后结构也比较清晰。有了本篇的介绍,之后再走读几遍代码,相信就能很好的掌握 pilot-discovery 初始化的流程。
Pilot 源码分析的第一部分就到这里,后续会针对重要的组件和接口做更细致的分析,如 EnvoyXdsServer 、ServiceEntryStore 等,以及梳理 xDS 协议的生成和下发流程,会比 pilot-discovery 的启动流程复杂的多,敬请期待。